
Welcome to the tutorial on creating a one-page theme using Bootstrap's One Page Wonder template for Scriptor CMS! In this tutorial, we will guide you through the process of building a stunning and responsive theme using the powerful Bootstrap framework. Whether you're new to Scriptor CMS or looking to enhance your website's design, this step-by-step tutorial will help you elevate your Scriptor CMS website to new heights. Let's get started!
To begin, let's set up the directory structure for our theme. Create a new folder called OnePageWonder inside the /site/themes/ directory.
Next, let's download the template from GitHub by visiting https://github.com/startbootstrap/startbootstrap-one-page-wonder. Once downloaded, place the template files in the /site/themes/OnePageWonder directory.
Now, let's create the necessary files inside the /site/themes/OnePageWonder directory. Here's the file structure:
OnePageWonder/
└───_ext.php
└───template.php
└───_navbar.php
└───_header.php
└───_article.php
└───_footer.php
└───404.php
└───js/
│  └───scripts.js
└───css/
   └───styles.css
Let's start by examining the template.php file. This file will contain most of the code from the original "One Page Wonder" template's index.html file. However, we'll replace certain parts of the code with function calls such as renderNavBar(), renderHeader(), renderArticle(), and renderFooter(). These dynamic template sections will be generated and rendered by PHP during runtime. Additionally, we have adjusted the URLs of the JavaScript and CSS resources to match our Scriptor project.
template.php:
<!DOCTYPE html>
<html lang="en">
    <head>
        <meta charset="utf-8" />
        <meta name="viewport" content="width=device-width, initial-scale=1, shrink-to-fit=no" />
        <meta name="description" content="" />
        <meta name="author" content="" />
        <title>One Page Wonder - Start Bootstrap Template</title>
        <link rel="icon" type="image/x-icon" href="assets/favicon.ico" />
        <!-- Google fonts-->
        <link href="https://fonts.googleapis.com/css?family=Catamaran:100,200,300,400,500,600,700,800,900" rel="stylesheet" />
        <link href="https://fonts.googleapis.com/css?family=Lato:100,100i,300,300i,400,400i,700,700i,900,900i" rel="stylesheet" />
        <!-- Core theme CSS (includes Bootstrap)-->
        <link href="site/themes/OnePageWonder/css/styles.css" rel="stylesheet" />
    </head>
    <body id="page-top">
        <!-- Navigation-->
        <?php echo renderNavBar($site); ?>

        <!-- Header-->
        <?php echo renderHeader($site); ?>

        <!-- Articles -->
        <?php echo renderArticle($site); ?>

        <!-- Footer-->
        <?php echo renderFooter($site); ?>

        <!-- Bootstrap core JS-->
        <script src="https://cdn.jsdelivr.net/npm/bootstrap@5.2.3/dist/js/bootstrap.bundle.min.js"></script>
        <!-- Core theme JS-->
        <script src="site/themes/OnePageWonder/js/scripts.js"></script>
    </body>
</html>
Next, let's take a look at the _ext.php file. The term "ext" stands for "extension," and in our case, this file acts as a library of functions responsible for the logic within the template. The functions defined here are responsible for rendering the dynamic template sections in template.php. It's important to note that if the _ext.php file exists in your theme folder, Scriptor will automatically load it before the template.php file. This makes it an ideal location to house our logic code.
_ext.php:
<?php

use Scriptor\Core\Scriptor;

/**
 * The getSite() method returns an instance of a class that
 * represents the current website.
 */
$site = Scriptor::getSite();

/**
 * Renders the navigation bar for a given site.
 *
 * @param string $site The website object.
 * @return string The HTML code for the navigation bar.
 */
function renderNavBar($site) : string
{
    $output = '';

    ob_start();
    include '_navbar.php';
    $output .= ob_get_clean();

    return $output;
}

/**
 * Renders the header of the website.
 *
 * @param object $site The website object
 * @return string The HTML code for the header
 */
function renderHeader($site) : string
{
    $output = '';
    $header = $site->pages()->getPage('template=opw-header');

    if (!$header) return $output;

    ob_start();
    include '_header.php';
    $output .= ob_get_clean();

    return $output;
}

/**
 * Renders a list of articles on a given site.
 *
 * @param object $site The site object to render articles for
 * @return string The HTML output of the rendered articles
 */
function renderArticle($site) : string
{
    $output = '';
    $articles = $site->pages()->getPages('template=opw-article');

    if (!$articles) return $output;

    $order_image_classes = [' order-lg-2', ' order-lg-1'];
    $order_text_classes = [' order-lg-1', ' order-lg-2'];
    $class_index = 0;

    foreach ($articles as $article) {
        ob_start();
        include '_article.php';
        $output .= ob_get_clean();

        $class_index = ($class_index + 1) % count($order_image_classes);
    }

    return $output;
}

/**
 * Renders the footer section for the given site.
 *
 * @param string $site The website object
 * @return string The HTML code for the footer
 */
function renderFooter($site) : string
{
    $output = '';

    ob_start();
    include '_footer.php';
    $output .= ob_get_clean();

    return $output;
}
Below that, we have the different template sections that are dynamically parsed by the functions in _ext.php.
_header.php:
<header class="masthead text-center text-white">
    <div class="masthead-content">
        <div class="container px-5">
            <h1 class="masthead-heading mb-0"><?php echo $header->name ?></h1>
            <h2 class="masthead-subheading mb-0"><?php
                echo $header->menu_title ?></h2>
            <a class="btn btn-primary btn-xl rounded-pill mt-5"
                 href="#scroll"><?php echo $header->content ?></a>
        </div>
    </div>
    <div class="bg-circle-1 bg-circle"></div>
    <div class="bg-circle-2 bg-circle"></div>
    <div class="bg-circle-3 bg-circle"></div>
    <div class="bg-circle-4 bg-circle"></div>
</header>_navibar.php:
<nav class="navbar navbar-expand-lg navbar-dark navbar-custom fixed-top">
    <div class="container px-5">
        <a class="navbar-brand" href="#page-top"><?php
            echo $site->config['site_name'] ?></a>
        <button class="navbar-toggler" type="button" data-bs-toggle="collapse"
            data-bs-target="#navbarResponsive" aria-controls="navbarResponsive"
            aria-expanded="false" aria-label="Toggle navigation"><span
            class="navbar-toggler-icon"></span></button>
        <div class="collapse navbar-collapse" id="navbarResponsive">
            <ul class="navbar-nav ms-auto">
                <li class="nav-item"><a class="nav-link" href="#!">Sign Up</a></li>
                <li class="nav-item"><a class="nav-link" href="#!">Log In</a></li>
            </ul>
        </div>
    </div>
</nav>_article.php:
<section id="scroll">
    <div class="container px-5">
        <div class="row gx-5 align-items-center">
            <div class="col-lg-6<?php echo $order_image_classes[$class_index] ?>">
                <div class="p-5"><img class="img-fluid rounded-circle" src="<?php
                     echo $article->images[0]->url ?>" alt="..." /></div>
            </div>
            <div class="col-lg-6<?php echo $order_text_classes[$class_index] ?>">
                <div class="p-5">
                    <h2 class="display-4"><?php echo $article->name ?></h2>
                    <p><?php echo $article->content ?></p>
                </div>
            </div>
        </div>
    </div>
</section>
Finally, the content of 404.php is simply taken from Scriptor's default theme. You can easily download the scripts.js and styles.css files from the original "One Page Wonder" template.
Next, you'll need to modify the custom.scriptor-config.php file located in data/settings/ by inserting the following parameter into the configuration:
'theme_path' => 'OnePageWonder/',This line ensures that the Scriptor CMS uses your new OnePageWonder theme.
After that, navigate to Scriptor's editor and create at least 3 pages there. These pages represent our articles and should use the _article.php template. They will be dynamically rendered at runtime by _ext.php:
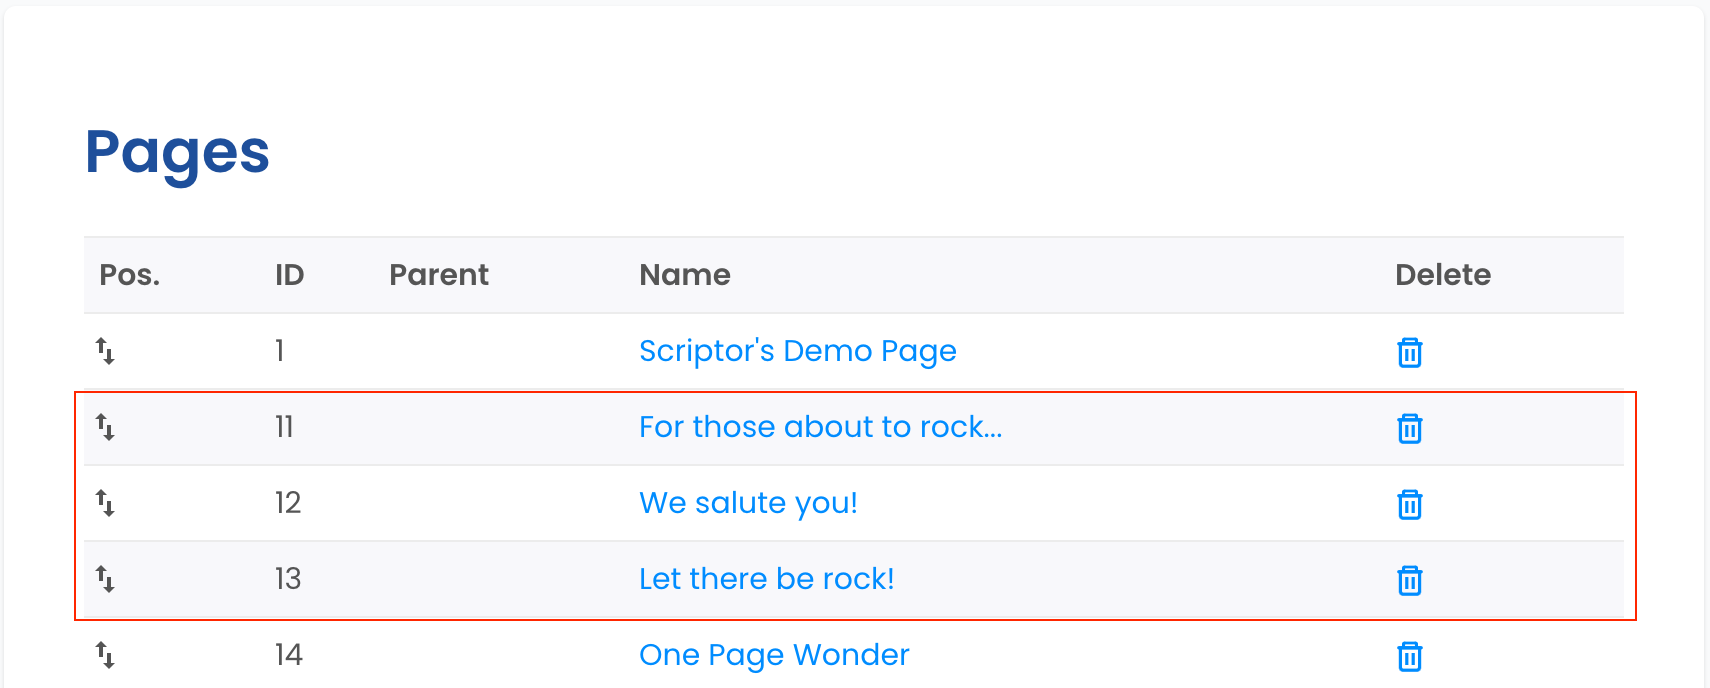
For example, your article pages could look like this:
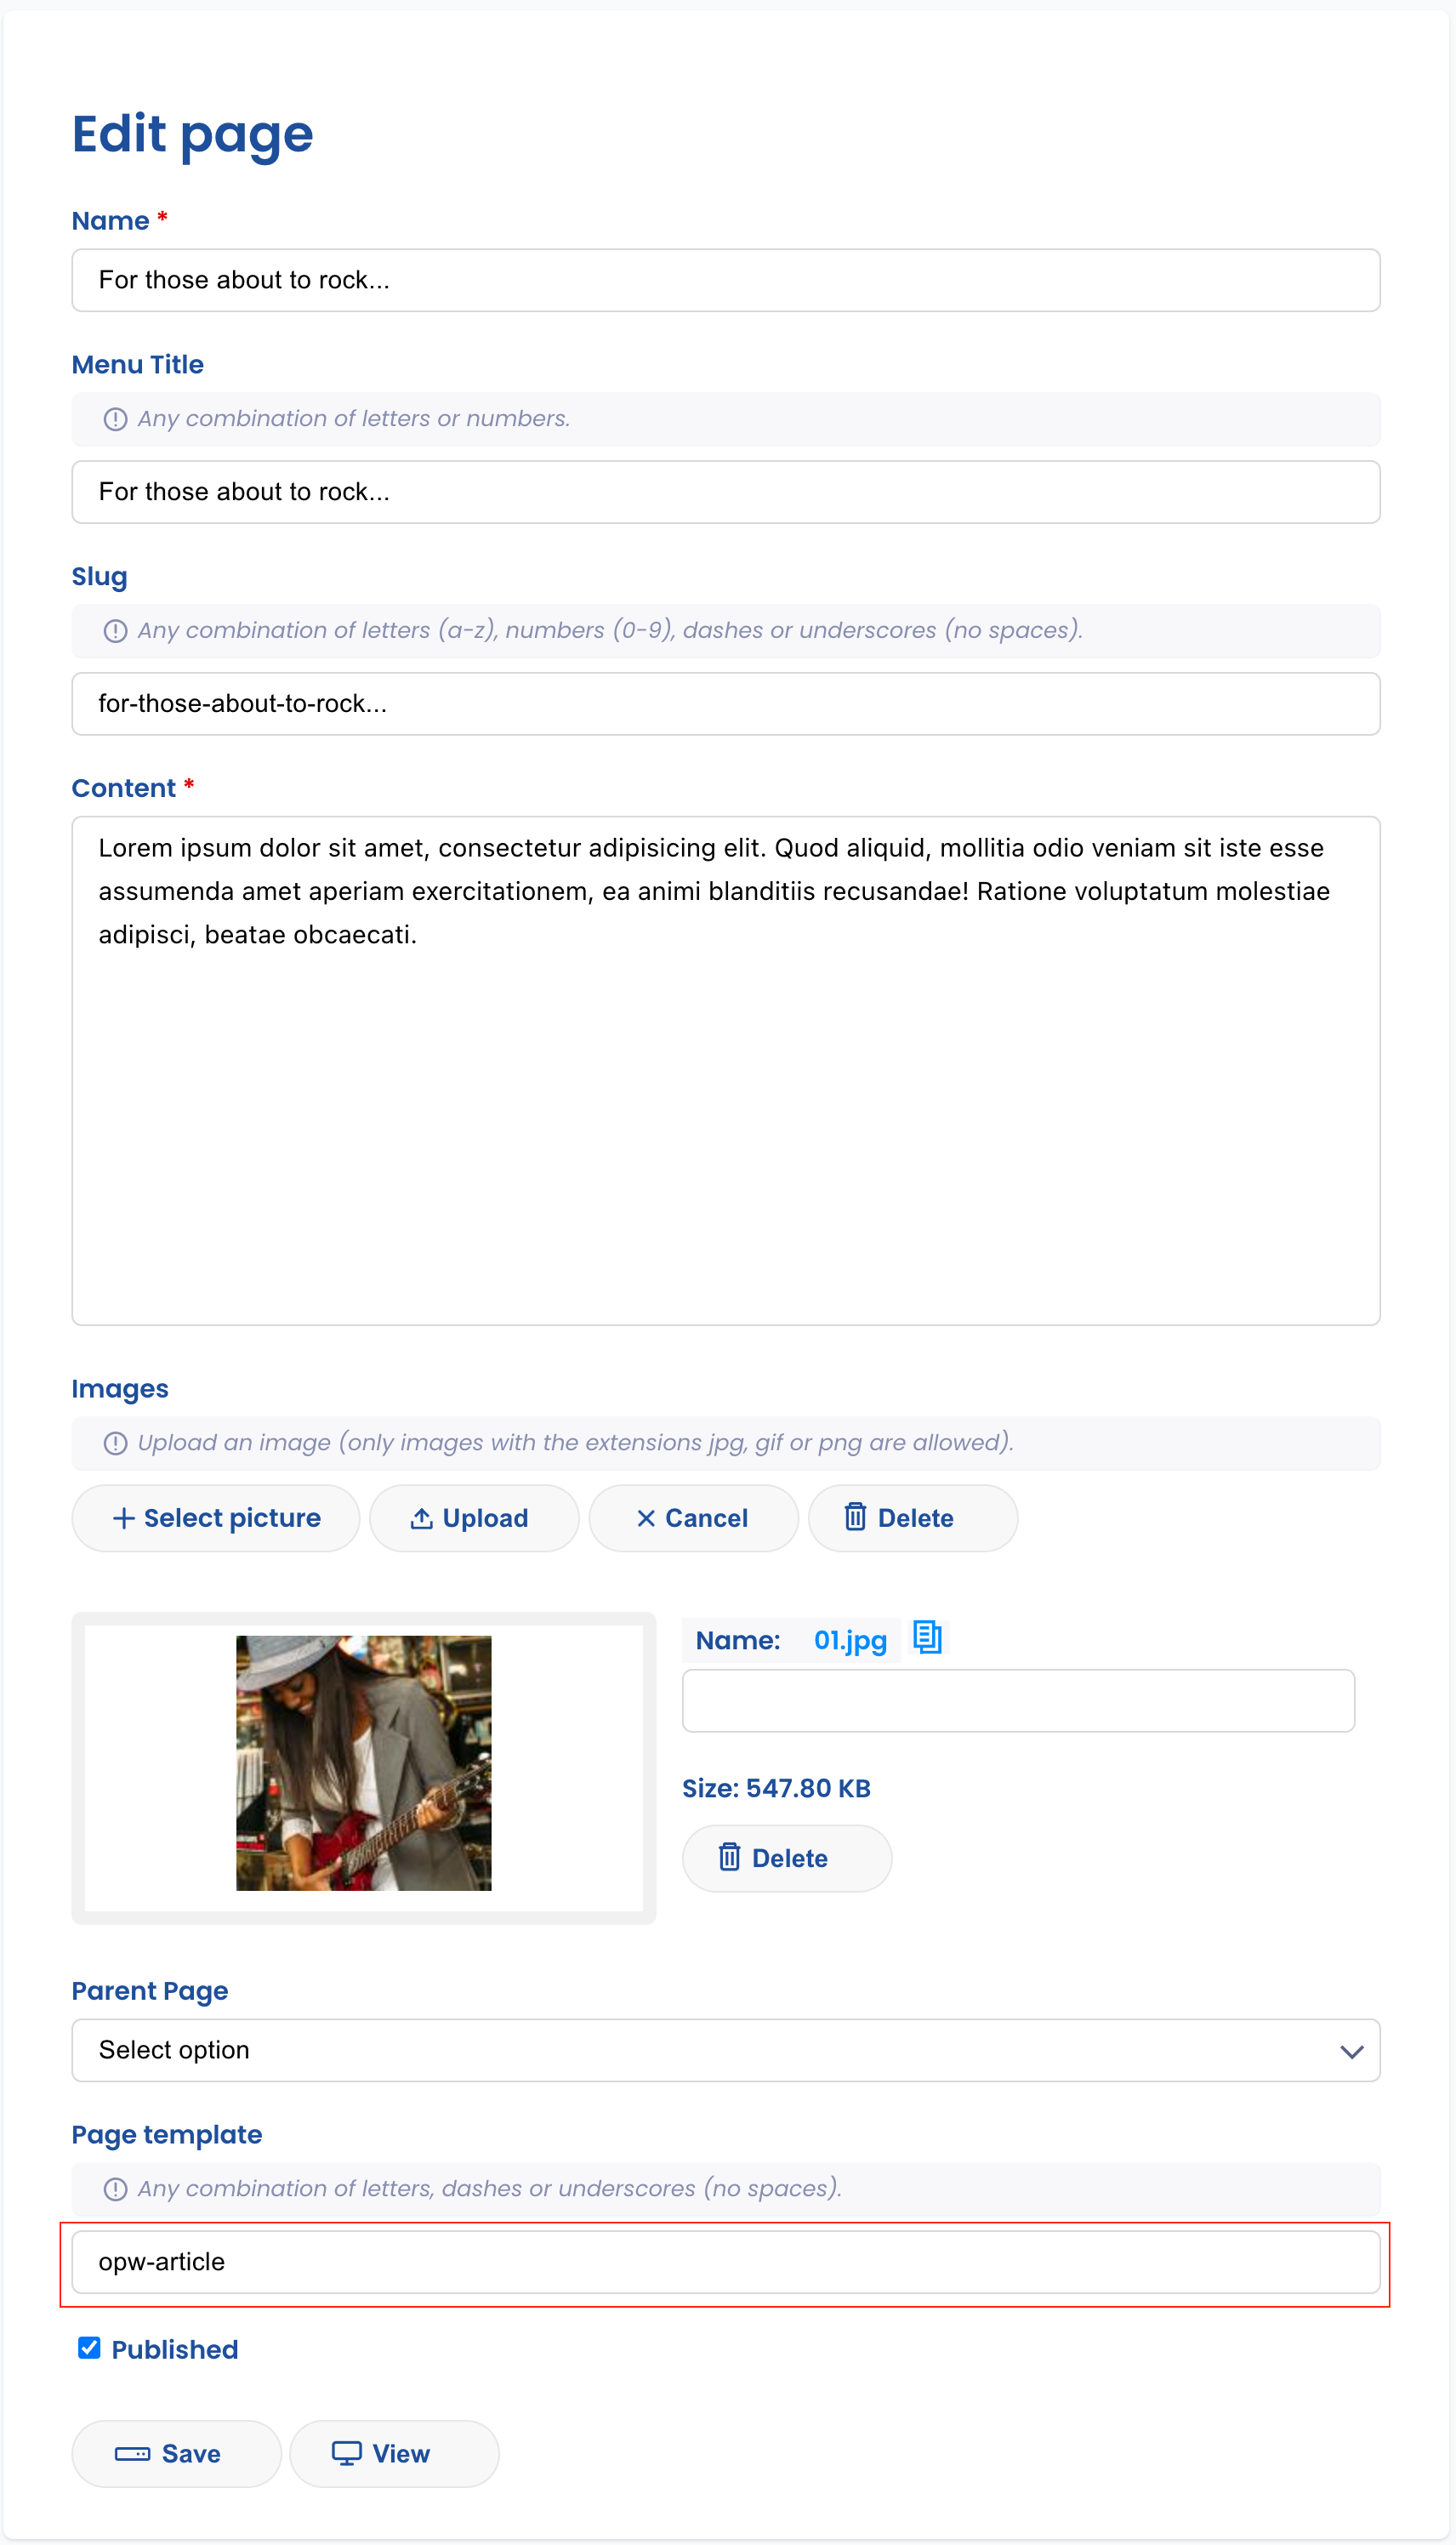
Since our theme script categorizes pages based on the template name, it's crucial that you assign an
opw-articleas the template name for the article pages (highlighted in red in the image).
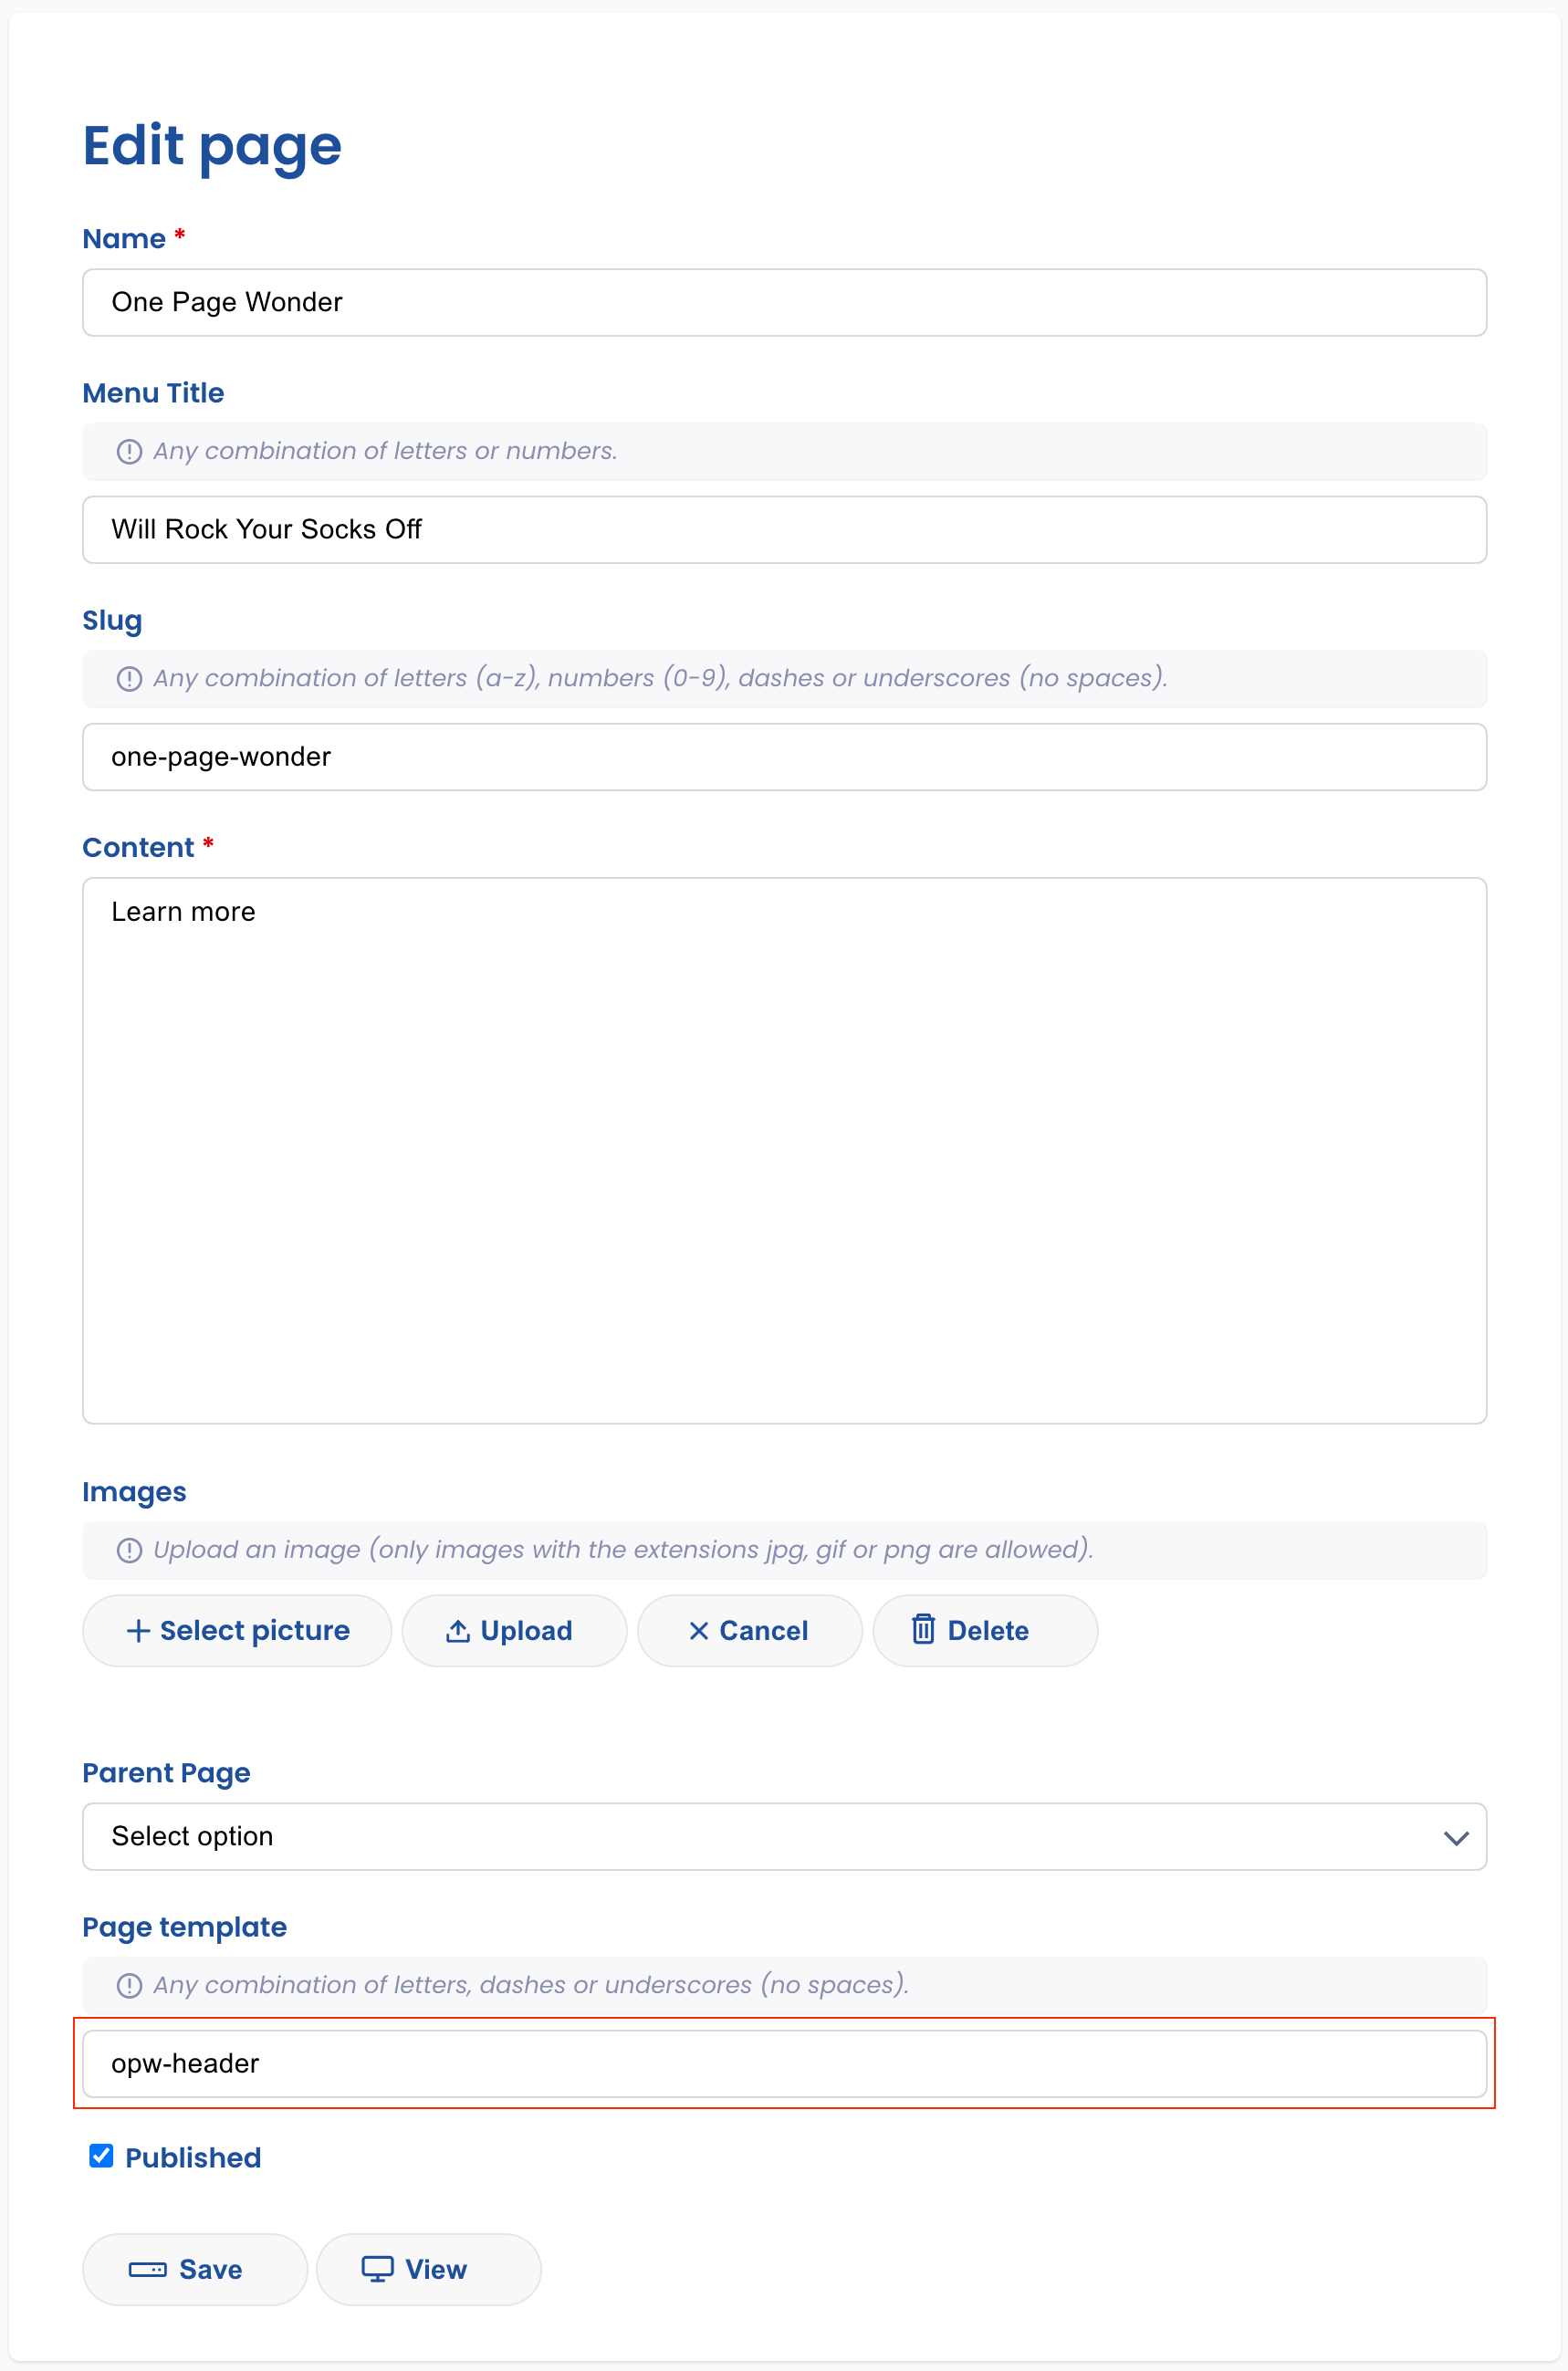
Now, create an additional page in the Scriptor editor that will serve as our header. It could have the following layout (don't forget to set the template name as opw-header):
This concludes the setup for the "One Page Wonder" theme in Scriptor CMS. You now have the foundation to create a captivating one-page website. Feel free to customize the theme further and explore the possibilities. Happy coding!
If you want to explore the theme, you can download it here.
I hope this revised tutorial meets your expectations. Let me know if you need any further assistance!