Scriptor utilizes an array-based configuration system, which offers several advantages over other approaches. By structuring the configuration as an array, Scriptor provides a clear and readable representation of the configuration data. Each configuration entry is defined using key-value pairs, enhancing the readability and comprehensibility of the configuration file.
One of the key benefits of using an array-based configuration is its flexibility and extensibility. The array structure allows for the storage of various configuration options and values. You can easily add new options or update existing ones by simply adding or modifying entries within the array. This empowers you to customize the configuration according to your specific requirements, making Scriptor highly adaptable.
Another important advantage of the array-based configuration is its immediate availability within the system. Since the configuration is stored in a PHP file, it is instantly accessible to the system without the need for separate reading or processing.
By using a PHP file as the configuration source, the system can directly access and utilize the configuration data. This means that any changes or adjustments made in the custom.scriptor-config.php file take effect immediately, without requiring additional steps.
This direct access to the configuration enables seamless integration of the customizations into the Scriptor system. It also simplifies development, as developers can directly access the configuration values to tailor specific features or behaviors.
Customizing the Scriptor configuration
Assuming you have successfully installed Scriptor following the instructions outlined in the previous chapter, let's now explore how to customize Scriptor for better accessibility.
Scriptor comes with default options defined in the scriptor-config.php file, which can be found in the /data/settings/ directory.
However, it's important to never modify this file directly. Instead, you should store all configuration changes you need to make in a file called custom.scriptor-config.php located in the same /data/settings/ directory. To do this, simply remove the underscore _ from the file name _custom.scriptor-config.php and add your configurations there.
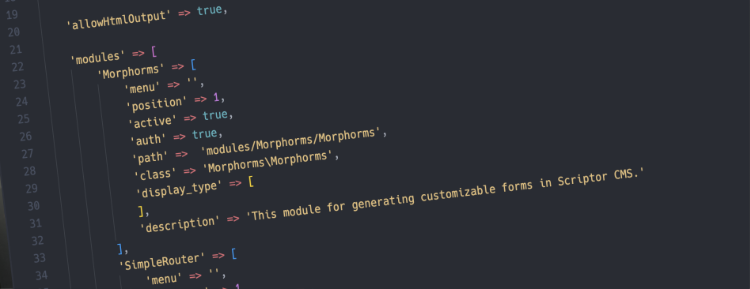
To extend Scriptor's capabilities with your own modules, you can leverage the 'modules' section within the configuration array. Here, you can define new modules by adding entries with specific parameters such as 'menu', 'position', 'active', 'auth', 'path', 'class', 'display_type', 'icon', and 'description'.
By specifying the 'class' parameter with the appropriate namespace and class name, you can link your custom module to the corresponding class file in your Scriptor installation. This enables you to create modules tailored to your specific needs and seamlessly integrate them into the Scriptor CMS.
The 'position' parameter determines the order in which the modules are loaded by Scriptor. You can assign numeric values to adjust the loading order of your custom modules. The module with the lowest value will be loaded first, followed by others in ascending order.
Extending Scriptor with Custom Hooks
In addition to customizing the Scriptor configuration and adding your own modules, you can further extend Scriptor's functionality by incorporating custom hooks. Hooks allow you to execute custom code at specific points within the Scriptor execution flow, enabling you to enhance or modify the behavior of the CMS.
To add your own hooks, you can leverage the 'hooks' section within the Scriptor configuration array. Each hook is associated with a specific event or action within Scriptor, and you can define multiple actions to be executed when that event occurs.
For example, consider the following code snippet:
'hooks' => [
    'Editor::beforeExecute' => [
        [
            'module' => '',
            'method' => function ($event) {
                $event->object->addResource('link', [
                    'rel' => "stylesheet",
                    'href' => dirname($event->object->siteUrl).
                             '/site/modules/monoPages/styles/styles.css'
                ]);
            }
        ],
        ...
In this example, the 'Editor::beforeExecute' hook is defined. It consists of an action represented as an array entry. Each action is defined by the 'module' and 'method' parameters.
To create your own custom hooks, you can replace the 'module' parameter with the appropriate module or leave it empty if the hook does not belong to a specific module. The 'method' parameter expects a callback function or a reference to a module method that contains the code you want to execute.
By adding your custom hook entries within the 'hooks' section, you can execute your code at specific points in the Scriptor execution flow. This allows you to extend and customize the behavior of Scriptor according to your requirements.
Through the use of custom hooks, you can integrate additional functionality, perform custom actions, or modify existing behavior in a flexible and modular manner within the Scriptor CMS.
Read also the chapter about hooks.